How to make scented soy wax candles at home

 Who doesn't love a good candle? You use candles to scent your home or office, to unwind or even to take away smells of food and cigar or cigarette smoke. But have you thought of trying your hand at making your own candles? It's super easy and fun for the whole family. There are easy accessible kits at both your local department and craft stores, see this episode here , where I used a candle making kit from Walmart! With kits you can not control the type of wax you have but you can definitely get the wax you need and that I personally prefer from a craft section from the discount department stores or from the craft store online or in store. First, you need soy wax, eight ounce candle tins, candle wicks, color, fragrance, glue dots or a glue gun and glue sticks ( I prefer the latter )...all these items are very affordable. Once you have everything you need, you're going to measure out one pound which is about sixteen ounces. This will give you three 8 ounce candles. The math

How to make scented soy wax candles at home

 Who doesn't love a good candle? You use candles to scent your home or office, to unwind or even to take away smells of food and cigar or cigarette smoke. But have you thought of trying your hand at making your own candles?


It's super easy and fun for the whole family. There are easy accessible kits at both your local department and craft stores, see this episode here, where I used a candle making kit from Walmart! With kits you can not control the type of wax you have but you can definitely get the wax you need and that I personally prefer from a craft section from the discount department stores or from the craft store online or in store.


First, you need soy wax, eight ounce candle tins, candle wicks, color, fragrance, glue dots or a glue gun and glue sticks ( I prefer the latter )...all these items are very affordable. Once you have everything you need, you're going to measure out one pound which is about sixteen ounces. This will give you three 8 ounce candles. The math doesn't seem right, but remember wax is a solid and once melted, it will actually end up being more and the exact amount you need. If you're coloring your wax, you can use a liquid colorant, that will color your wax after it is melted or a wax block that you will add to the wax before it is melted.


Melting your wax is pretty straightforward, you can invest in a candle making device or use a double boiler the same way you would with cooking. Use a glass or metal bowl you don't mind tossing if it came to it and set it over a pot of slow boiling water, allow to sit and melt while checking on it and stirring. Do not leave your candle maker or double boiler unattended!


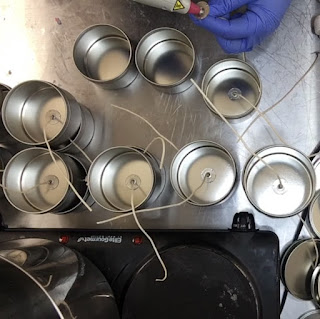
While your wax is melting, prepare your tins with your wicks and glue dots or melted glue sticks using the glue gun. Whichever method you choose make sure your wick is in the center of the tin. You may need to get wick holders if this is your first time making candles so your wicks will remain center during and after the pour. Set your candle tins with the wicks attached to the side. Now it is time to prepare your fragrance. You can use a synthetic fragrance or an essential oil. Make sure whatever scent you're using it is candle safe, which means it can withstand heat and won't cause you problems in the long run with burning your candle. According to the manufacturer recommendation, is how much or how little of the scent you should use and when to pour it into your hot or warm wax. For this part you will need a heat thermometer. You can use an infrared heat gun or even a candy thermometer to gage how hot your wax is. As a rule of thumb don't pour any light fragrances above 130 degrees F or any other fragrances above 185 degrees F. After you have added your fragrance, mix to bind the scent to the wax for no less than two minutes. 


After mixing in the fragrance allow the wax to sit. Once it starts to look like a slushy consistency, pour your wax immediately into your tins up to the fill line inside the tin. Allow your candles to fully solidify and then clip your wicks to about a quarter of an inch, cover with your candle tin lid and allow to cure for at least two weeks! Yes, just like soap, candles must be cured to retain the scent so it will burn with the scent nicely and evenly. 


If you're up for the challenge, watch the episode below and follow along to make your very own scented soy wax candles at home!


Watch Full Episode Here:


Signing Off,

Deborah

As Always Be Well and Stay Blessed...Until Next Time, Keep Creating xoxo

Comments

Popular posts from this blog

Cannabis Inspired 420 Cold Process Soap For Stoners

Since people found out there was a leaf that could be smoked and would give you a feeling of euphoria and relaxation, they have been rolling joints and lighting bongs. The 420 celebration is the mother of them all when it comes to "hippie" festivals and I am no stranger to them. This is my tribute to stoners everywhere! This cannabis inspired cold process soap, is made with CBD Oil from Bluebird Botanicals , Super Sparkle Iridescent Glitter and Hemp Fragrance from Wholesale Supplies Plus, Green Vibrance and Neutral Gray Micas and Titanium Dioxide from Nurture Soap . The whimsical design and coloring was to give a peace and love type of euphoric feel. The muted green and gray colors give this soap a mellow and laid back tone while the melt and pour marijuana leaf embeds and soap dough joint let's you know just what this soap is about if the smell doesn't tell you already. As a person that suffers from PTSD and the high anxiety and paranoia that comes wi

Making Soap Dough Decals ( Soap Dough )

When you think of soap decorations or design, as a soap maker; you're usually imagining something beautiful, colorful and will match the theme of your bar soap! With the Way of Color Bar Soap, I had ocean creatures in mind; whether fictional or real life sea dwellers to add to the soap.  I began, with designing my soap, thinking of a color and fragrance that would coincide with what I had envisioned and what would capture the essence of what I was trying to portray within the soap itself.  With the left over soap, I actually made my soap decals! The process is simple and easy. You simply take soap that hasn't been cured and still loose and cut all air from it. Some make an entire loaf and leave that covered or, like me; you can pour the unused soap and add it to Ziplock or sandwich bags and leave them in the refrigerator overnight. This process should slow the saponification process down and keep the soap soft and moist so it can easily be molded.  When you're ready to actu